
Salesforce Integration Cloud & Analytics Cloud
In this blog, I am evaluating ‘Mulesoft’ Integration capabilities for Einstein Analytics. I am using Mulesoft as a Middleware (ETL) for executing dataset operations such as creating EA Datasets. Then in the next step in executing further data operations such as Overwrite/Append/UPSERT in a simple batch job by using theirs out of the box supplied connector for Salesforce Analytics.
Background:
Mulesoft has been lately acquired by Salesforce in order to strengthen their integration capabilities in the ecosystem or another extension to their product suite (Integration Cloud). Also, it’s very essential for enterprises to link all of their applications and data to ensure information can flow freely throughout their business. Only then they can leverage the tremendous power of analytics. This will also help companies to unlock their valuable data trapped in old legacy systems by using out of the box Anypoint connectors available in the application.
Benefits of MuleSoft’s Salesforce Analytics Cloud Connector:
Salesforce Einstein Analytics is a data discovery tool built to enable organizations to derive insights from their data. But when you take these scenarios into consideration, loading data into the Analytics platform can seem to be a challenging task when you are dealing with traditional data warehouse sources :
- Data trapped in on-premise databases or back office ERP systems
- The need for data cleansing and data mashup from disparate sources
- The need for event-based triggering or scheduling of uploads
Use case Overview:
As I have decided to showcase the most traditional use case or Mulesoft capability by –
- Scheduling the CSV Flat File from my local machine (Local Directory) in order to create my Dataset in Einstein Analytics. -> Batch Job 1
- Based upon the outcome of my first Batch job I will later extend the same dataset implying further operations such as Append in this use case. -> Batch Job 1.1
Further Possibilities (Not Covered):
- Business Logic & further complex transformations are not part of this. But can be handled also in Mulesoft easily, if you wish to explore this use case further.
- You can create sub-batch processes or batch jobs based upon the outcome of one job if needed in your ETL development. In order to simplify this use case for the broader audience, I am showcasing two simple batch jobs (One for Dataset Creation & another for Dataset updates such as APPEND etc).
Environment Overview:
- Mulesoft: Anypoint Studio Version: 7.1.3 & Mule Server 4.1.2
- Add Salesforce Analytics Component in your Mulesoft environment.
- Salesforce Development Environment: Analytics Enabled.
Environment Downloads:
- 30 Day Free Trial: Source Link
- Salesforce Free Dev Account: Source Link
Mulesoft Batch Architecture Overview:
Below is the overview of my Mule flow batch job (Snapshot Below).
 Mule Flow-IamTrailblazer
Key Considerations:
- Product documentation and snapshots are outdated on the knowledge forums. Therefore be careful to download the right version in order to avoid any conflicts or errors.
- Make sure to download the Anypoint Studio in the root directory (C Drive) of your machine
- If you don’t have Salesforce Analytics component activated in the Mulesoft anytime studio. Then you need to download the component package from the Mulesoft Marketplace (Exchange). –Source Link.
Implementation Focus Steps:
Below are the key steps in order to have your first automated ETL job to create your DATASETS
- Download Anytime Studio
- Download Salesforce Analytics Connector
- CSV File & structure schema Preparation
- Salesforce Global Configurations
- MULE Job Configuration
- Debug your JOB in Salesforce
- Monitor the job run in Einstein Analytics
- Dataset Creation.
Solution Overview:
Once you have Anypoint Studio installed and Salesforce Analytics activated in your studio environment. The process is the same if you have installed any environment like eclipse or visual studio with a defined path of workspaces and directory.
Step 1: Create Mule Project:
In the first step, we will create our first Mule Project. Go to File menu at the very top and then select NEW Mule Project (Snapshot Below)

Then give your project some meaningful name. Set the project location path from your local machine.

Step 2: Create Mule Global Elements (SFDC Connection Establish):
We will define or establish now our ‘Salesforce Connection’ global element. We can use this global element to apply configuration details to multiple local elements in our mule flows later. In this step select global elements at the right panel and press CREATE (Snapshot Below).

Now you need to select the ‘Salesforce Analytics Config’ global type (Snapshot below).

Select the connection type ‘Username Password’and set your user credentials with password & security token. Make sure the given user (Integration User) must have API enabled and all EA Admin permissions for the successful integration. (Snapshot Below)

Then check your SFDC Connection by pressing ‘Test Connection’ and validate the connection. If it’s successful then you get the pop up stating that. (Snapshot Below)

Note: In case if you don’t see the ‘Salesforce Analytics Config’ selection in your studio environment. This could be it is not properly installed or you forget to add the module from the right Mule Palette. Make sure to install the analytics component package and make it available in the ‘Module’ palette section by pressing ‘Add Modules’ from the palette.
Step 3. Mule Batch Job Configuration: (Dataset Creation):
In this step, we will create our Mule Flow to create our CSV based dataset in Einstein Analytics. Below are the Mule components I am using for my sample batch job:
- Mule Scheduler
- Mule File Reader
- Mule Logger
- Upload External Data into a new dataset and start data processing
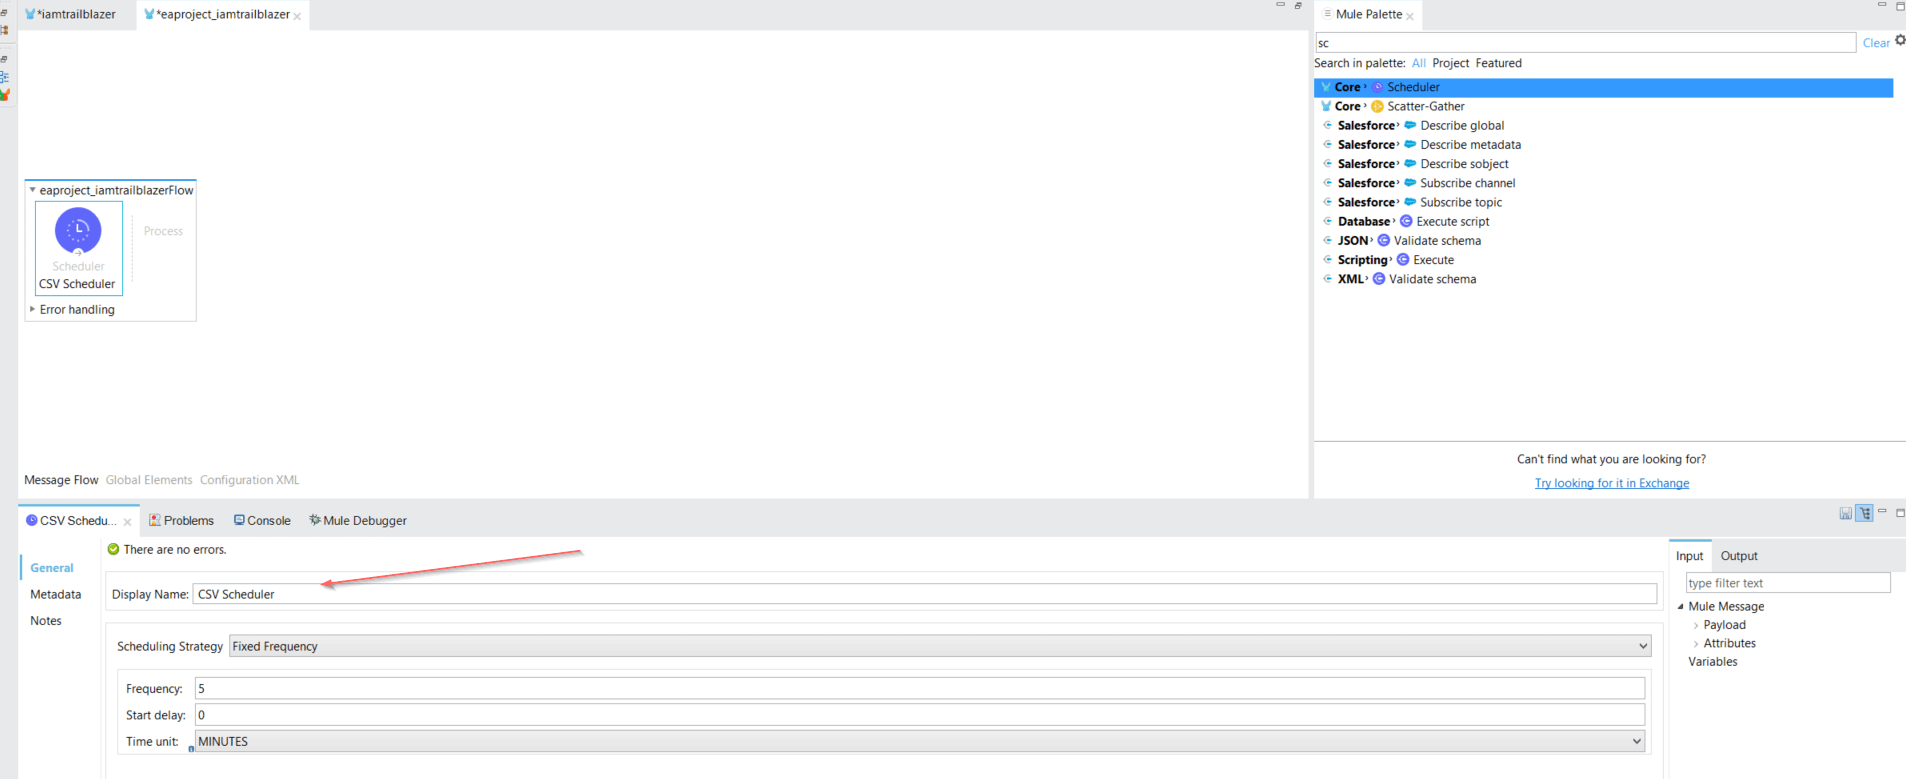
- Mule Scheduler / Poll Scheduler: By default, Poll Scopes in Mule are set to poll a resource every 1000 milliseconds for new data. We can adjust the polling based upon our needs in order to schedule the CSV for our target dataset. Now we can drag the scheduler component from the palette on the message flow canvas. This is our first initiation point to trigger the Mule job in this batch. (Snapshot Below)
- File Read Connector: Through this component, we will define our CSV path from our local machine to read the dataset CSV file. In the first step, we will first create the file connector configuration and then give our file path to be used for our dataset source. Drop the File read component from the palette on the mule canvas. Then add the name attribute and press plus icon at the right corner then press Ok (Snapshot Below)

- Logger Component Reference: In this step, I am adding two logger component in order to monitor any error messages, status notifications or exceptions. We can bring the logger component from the mule palette on the canvas.
Logger 1 – Debug

Logger 2 – Info

- Upload Data Salesforce Analytics Component: This operation will upload a Data Part which is kind of a child to Dataset. In this step we will upload CSV external data into our new Dataset and initiate the data processing. Bring the ‘Upload external data into new dataset and start processing’ component from the Mule palette into your canvas and filled the relevant attributes (Snapshot Below).

“Start Data Processing” operation which will trigger the Analytics job to create the dataset in Einstein Analytics. After this operation is triggered in Mulesoft, then you can simply view it by using “Data Monitor”. The job usually takes time to process and completely depending upon the data volume you want to push. I would highly recommend distributing your heavy CSV into several chunks in order to process it efficiently. There is a full documentation on EA API and best practices feel free to check it. Read More –Link
Edgemart Container: This attribute is your APP folder developer name where you want your ‘Dataset’ to be stored. (Snapshot Below).

Type: We need to provide the Metadata JSON file’s path. Creating or even operating on a Dataset requires a Metadata JSON which acts as a schema to the Dataset. You can create your own scheme based on this guide provided by Salesforce. Read More – Link
Steps Summary:
Let’s have a quick overview of what we have done so far and the expected outcome overview if the job will be finished successfully.
- New Dataflow Job will be triggered with ‘Overwrite’ API Data operation in Einstein Analytics.
- New Dataset will be Created named as ‘Mulesoft_Dataset’
- Target Dataset will be stored in our APP Folder named as ‘Mulesoft’
- Total Number of expected rows in my dataset will be 985 records (Snapshot Below).

Step 4 Mulesoft Job Run & Dataset Creation:
In the last step, we will run our Mulesoft trailblazer project by right-clicking on the message flow canvas. (Snapshot Below)

Then you can monitor your job in the Mulesoft console (Snapshot Below).

You can monitor your job in the Einstein Analytics Data Manager Monitor tab. (Snapshot Below- Operation Overwrite).

Voila 🙂 Now you can see the dataset in Einstein Analytics which is triggered from Mulesoft.

Step 5 Mulesoft Job Run & Dataset Rows Append:
In this step, I am using the same batch job in order to simplify this use case. But we can create nested batch jobs if needed and trigger event based rules with more complex business logic. Assuming my CSV data rows have been extended by the data team while I was away on vacation with the same number of rows 985. Now Below sample batch job will simply extend the rows on my Mulesoft dataset by using APPEND Data operation. (Snapshot Below)

Based upon the Append operation now new 985 rows will be extended to my Mulesoft_Dataset. Now the total rows will be 985 * 2 -> 1970 rows (Snapshot Below- Operation APPEND)

Now you can see the new appended registered dataset below.

Debugging / Audit trail:
In case your dataflow job is not triggered or your dataset is still not created.
- Check the name of your APP Folder (Edgemart container).
- Maybe worth checking Salesforce Developer Console whether the dataset rows have been processed or not. (Snapshot Below).

Console Sample Query: Select id,EdgemartAlias,EdgemartContainer,EdgemartLabel,Status,Action,isDeleted,StatusMessage,LastModifiedDate from InsightsExternalData where EdgemartAlias = ‘mulesoft_dataset’
Summary & Conclusion
I have used the fairly straightforward sample use case in order to showcase the dataset creation via Mulesoft. Indeed there could be plenty of ways to execute the same thing in a more different or sophisticated way. Feel free to loop me in, as I am always open to know or learn new good practices in the domain.
For the new audience on this topic, I hope it gave you a fair idea about the Mulesoft application utilization in regards to Einstein Analytics.
Cheers!
Varun
nice work. LOVE IT! Wouldn’t mind seeing the same process from SQL Server and/or an SAP instance as further examples.
Thanks Chris. I will keep you posted if I will get my hands on these sources in the near future.
Excellent stuff! I’ve used Informatica Cloud Integration but am new to Mulesoft. Thanks!
Thanks Mark
Great job!!.. Looking forward to Azure integration in your upcoming blogs.